How to Make Paper Dragon Puppets That Move
Create a lively paper dragon puppet that truly moves with this simple guide on how to make paper dragon puppets. Using basic tools and materials, you can craft a flexible, fun dragon that bends, flaps, and comes to life. Whether for a kids’ activity, classroom project, or personal hobby, this DIY dragon is an exciting way to bring mythical creatures to life. Follow these step-by-step instructions to build the body, craft the head and tail, and add finishing touches. Make a puppet that doesn’t just sit still but moves gracefully, offering a rewarding and entertaining crafting experience.

Tools and Materials You’ll Need
Before starting, gather the following tools and materials to make the crafting process smoother. Preparing these items ahead of time ensures you can focus on crafting without interruptions:
Colored Paper or Cardstock: Choose sturdy paper for the body, head, and tail. Cardstock is ideal because it’s thick enough to hold shape but still flexible. You can use different colors to make the dragon more vibrant, such as red for a fire dragon or green for a forest dragon.
Scissors: Use a sharp pair of scissors for cutting out the shapes cleanly. If you’re crafting with young children, safety scissors are recommended.
Glue or Double-Sided Tape: Choose glue sticks or double-sided tape for mess-free assembly. For stronger bonding, consider using liquid craft glue, especially for attaching thicker embellishments.
Markers or Crayons: Use these to add details such as scales, eyes, or fire effects. You can also create shadows and highlights to give your dragon a more three-dimensional look.
Brads or Split Pins: These are essential for creating moving joints at the head, tail, or wings, allowing your dragon to bend and twist. Make sure to get ones that match the size of your project for easy manipulation.
Craft Sticks: Attach craft sticks to different parts of the puppet for better control. This makes the dragon easier to handle and allows for more dynamic movement during play.
Optional: Sequins, Glitter, or Other Embellishments: Add flair by decorating your puppet with shiny sequins, sparkly glitter, or textured elements like feathers or felt. These materials will make your dragon stand out and appear more lifelike.
Hole Punch: If you’re using brads for joints, a hole punch will help create uniform holes for easy assembly.
Ruler and Pencil: Use these for drawing precise shapes and lines when cutting out the dragon’s body and other parts.
Having these materials on hand will ensure a seamless crafting process, allowing you to focus on bringing your paper dragon puppet to life.
Step-by-Step Guide to Crafting a Moving Paper Dragon Puppet
Creating a moving paper dragon puppet involves several steps. Here’s how to make each part of the dragon and assemble them into a flexible puppet.
Step 1 – Building the Dragon’s Body
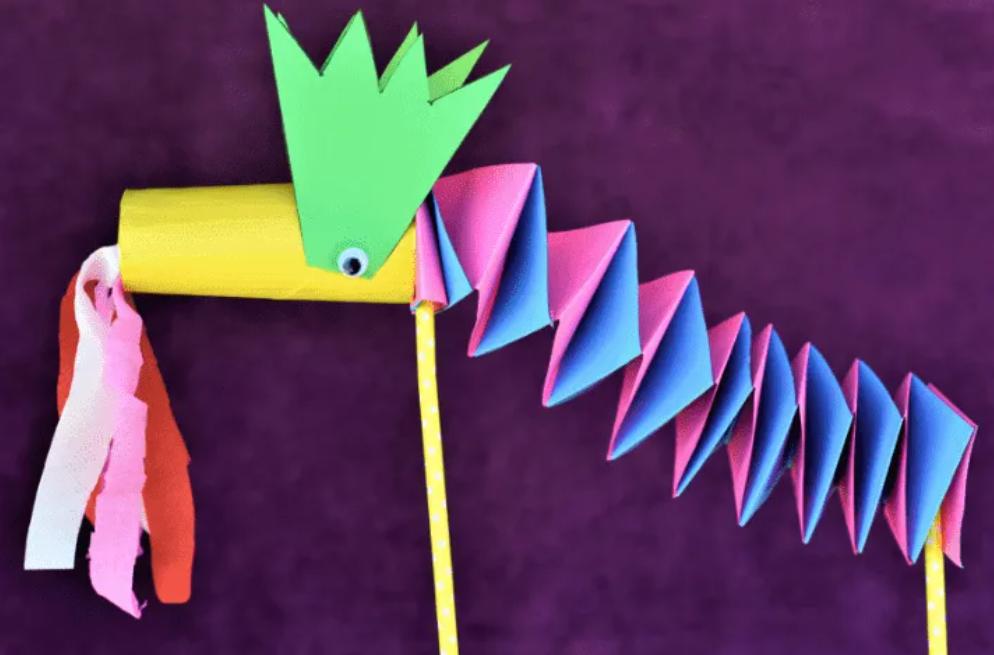
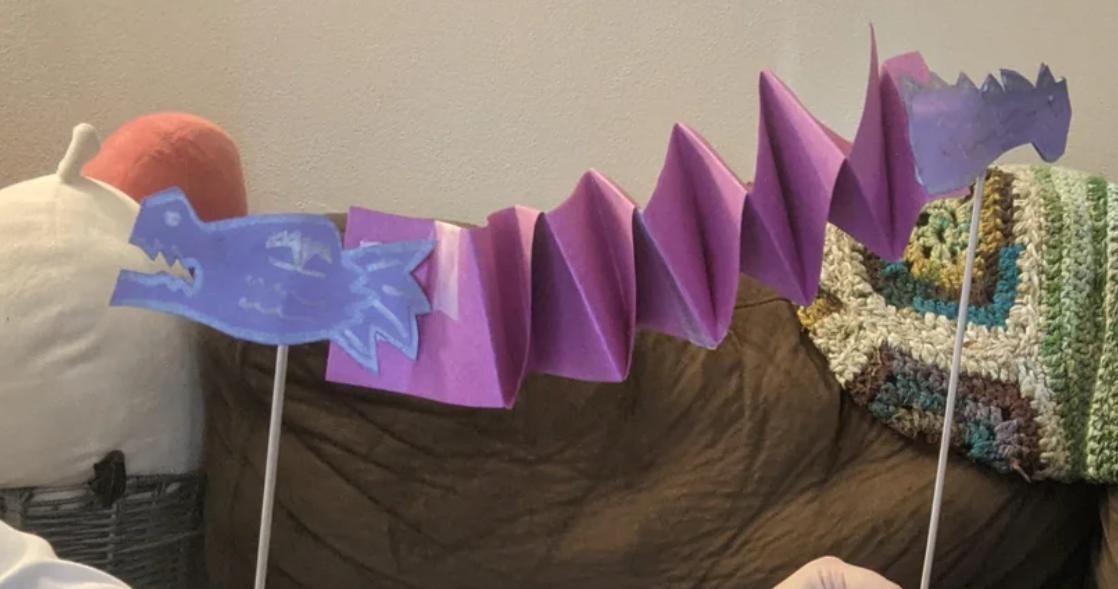
Start by cutting out the dragon’s body shape from a piece of colored paper or cardstock. Aim for a length that will allow the dragon to appear long and serpentine, with a slight curve to mimic a natural dragon’s movement. A typical body length is around 12-18 inches, but you can adjust based on the desired size of your puppet.
To give the body flexibility, fold the paper in an accordion style. This folding technique lets the puppet bend, twist, and move in a lifelike manner. Make the accordion folds about 1 inch wide for better flexibility and a more detailed look. If you want extra movement, consider adding small accordion-folded wings or legs to each side of the body.
Once folded, use markers or crayons to decorate the body. You can draw scales, add stripes, or create unique patterns that reflect the dragon’s type—such as fiery reds and oranges for a fire dragon or greens and blues for a forest dragon. You could also glue small pieces of tissue paper or foil to add texture and color.
Step 2 – Crafting the Dragon’s Head and Tail
Cut out the dragon’s head and tail using matching colored paper or cardstock. Make the head large enough to feature prominent details like eyes, nostrils, and a wide mouth. Consider creating layers for these features; for instance, cut out separate pieces for the eyes, teeth, or horns and glue them onto the head for a 3D effect.
The tail should be long and pointed to give the classic look of a dragon. You can also shape the tail in a zigzag pattern for a dynamic appearance. Add extra details like fins, spikes, or patterns to make it more elaborate.
Attach the head to one end of the accordion-folded body and the tail to the other using glue or tape. For a more dynamic look, you can add movable features like a tongue made from red or orange tissue paper, or even attach small paper flames to the mouth. Drawing teeth, scales, or even a beard onto the head can make the dragon look more fierce or whimsical, depending on your design.
Step 3 – Connecting the Parts for a Moving Puppet
For a fully articulated puppet, you need to connect the head, body, and tail with brads or split pins. Start by punching small holes at the points where the head meets the body and where the tail meets the body. Insert the brads into the holes and secure them on the other side, allowing the head and tail to pivot. This flexibility will enable your puppet to mimic lifelike movements.
To make controlling the puppet easier, attach craft sticks to the bottom side of the head and tail. You can hold these sticks to move the dragon up, down, and side to side, giving it a range of motion that makes the puppet interactive. Adding another craft stick to the middle of the body can provide extra control and stability. Test the movement by gently manipulating the sticks to see how the puppet bends and twists.
Ensure that all connections are secure, and make any necessary adjustments to improve the puppet’s flexibility or range of motion.

Adding Finishing Touches to Your Paper Dragon
With the main structure complete, it’s time to personalize your dragon with decorations and embellishments. This will make it truly unique.
Decorating with Colors, Patterns, and Textures
Use markers, crayons, or colored pencils to add additional patterns and details to the dragon’s body. Consider drawing scales, adding stripes, or creating intricate designs along the wings. You can also glue on pieces of tissue paper or colored foil for a textured effect. Experiment with different colors to give your dragon a fiery or icy appearance. Adding a gradient effect can make the dragon look more realistic. If you want a shinier finish, you can even use metallic paint or glitter glue.
Adding Embellishments for Realistic Effects
To give your dragon an extra touch of realism, consider adding embellishments like sequins, small beads, or even feathers. These can be used to mimic scales, eyes, or other decorative features. You might also want to add a tongue or tiny flames to the mouth, made from red or orange tissue paper. Using googly eyes can give your dragon a fun, playful look. Be sure to securely attach any embellishments so they don’t fall off during playtime.
Conclusion
How to make paper dragon puppets that move is a fun and rewarding project that lets your creativity shine. With a few simple materials and some crafting techniques, you can bring a mythical creature to life and enjoy hours of entertainment. Whether it’s for a school project, a play session with kids, or a personal hobby, a moving paper dragon puppet is sure to impress. Now that you know the steps, it’s time to gather your materials and start crafting. Your dragon puppet awaits!
FAQ
Can I use recycled paper for making the dragon puppet?
Yes, recycled paper works great for making dragon puppets. It’s an eco-friendly option, and the texture can add character to your puppet. Just ensure the paper is sturdy enough for crafting.
How do I ensure the dragon’s parts move smoothly?
Make sure to use brads or split pins for the joints, and punch clean holes for them to fit through. Test the movement before decorating to ensure everything pivots as it should.
What are some other animal puppet designs to try?
You can make various other puppets such as lions, birds, or even dinosaurs. The process is similar to creating a dragon, with adjustments for the unique shapes and features of each animal.

